
GPS Map Camera
Share the geolocation of streets/places through photos with your family and friends, letting them in on your most cherished travel memories on Earth.

Experience the seamless integration of your travel memories with the world around you using the GPS Map Camera photo stamp application. Elevate your photo gallery by effortlessly adding DateTime, latitude, longitude, weather, and wind speed details to your visuals. Take your travel documentation to new heights by embedding geographical and meteorological context, creating a dynamic travelogue that goes beyond mere images.
Stay connected with your past adventures by tracking your location and weather data through the intuitive features of the GPS Map Camera application. Share the magic of your explorations with loved ones by sending geolocated photos, allowing them to virtually stroll through the streets and places you’ve encountered. Let your family and friends join in the excitement of your adventures as you send them geotagged snapshots, providing a vivid narrative of your Earth travel memories.
Transform your photo album into a captivating travelogue, using the GPS Map Camera application to encapsulate not just visuals but also the geographical and atmospheric nuances of each moment. Enrich your storytelling capabilities by sharing geolocation-enabled photos, turning each image into a portal that transports your loved ones to the heart of your travel experiences.
Immerse yourself in the multifaceted storytelling potential of your photo collection by leveraging the GPS Map Camera to stamp each image with the context of time, place, and weather. Foster a deeper connection with your travel memories as you weave a comprehensive narrative that includes not just visuals but also the geographic and meteorological tapestry of your adventures. With the GPS Map Camera, reliving and sharing your travel experiences has never been more immersive and engaging.
Step 1:- Download and Install the App
Begin by downloading the GPS Map Camera app from the Windows app store on your device. Follow the on-screen instructions to install the app.
After successfully installing the GPS Map Camera app, you can either click on the Camera button to capture a new image or select the Gallery button to choose an existing image from your device’s file system.
Once you’ve captured or selected an image, proceed to the next step by clicking on the Crop & Edit button. Here, you have the option to crop the image, flip it vertically or horizontally, or rotate it left and right to achieve the desired orientation.
After making the necessary adjustments, click the “Crop & Next” button to move on to the next editing feature.

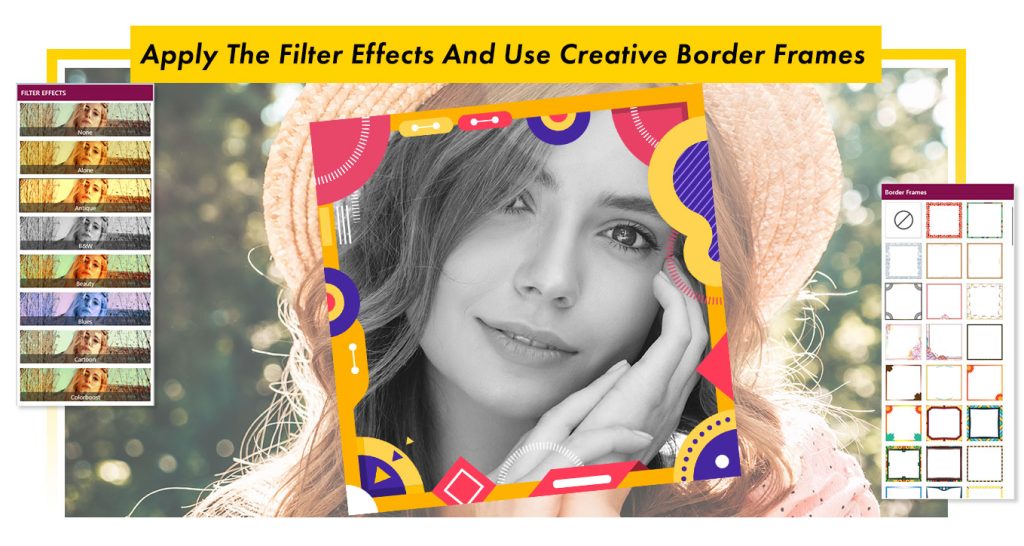
Step 2:- Apply Filter Effects
- Now, click on the Filter button to access a variety of filter effects. Choose your favorite filter effect from the available options and apply it to enhance your image.
- Once the filter is applied, you can further fine-tune or proceed to the next editing feature as needed. Continue exploring the app’s features to make your image visually appealing.
- Click on the ‘Frames‘ button, choose your favorite frame, and apply it.
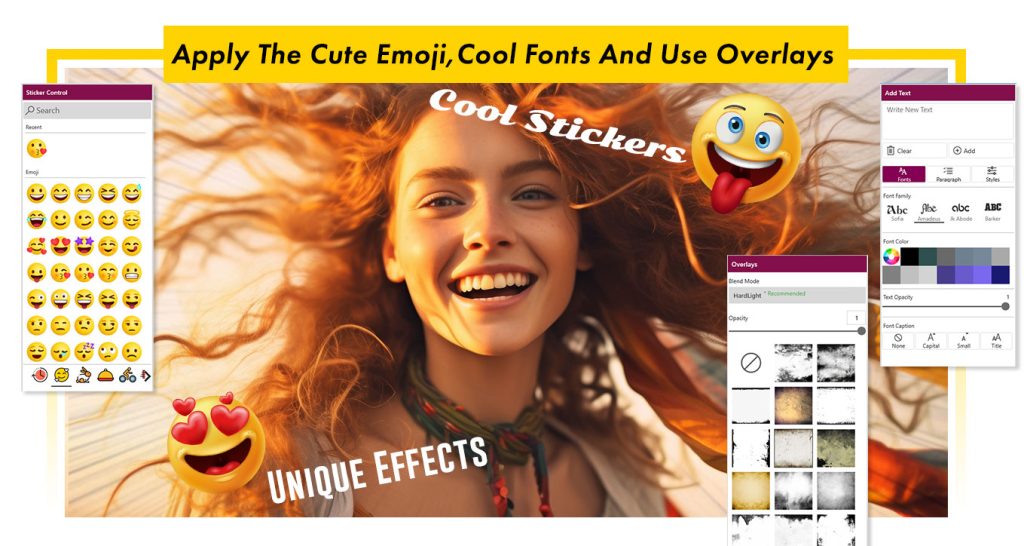
Step 3:-
- Click on the ‘Stickers‘ button, choose your favorite sticker, and apply it to create your GPS map camera image.
- The ‘Text‘ button allows you to add your thoughts or provide a name to your image creation. Additionally, you can adjust text opacity, font style, text color, and more.
Step 4:-
- The ‘Adjustment‘ button helps you adjust your image brightness, contrast, sharpening, exposure, warmth, and many more settings.
- Click on the ‘Blur‘ button, choose your favorite blur shapes, and apply them to your image creation. Additionally, you can adjust the blur shape and its value for further customization.

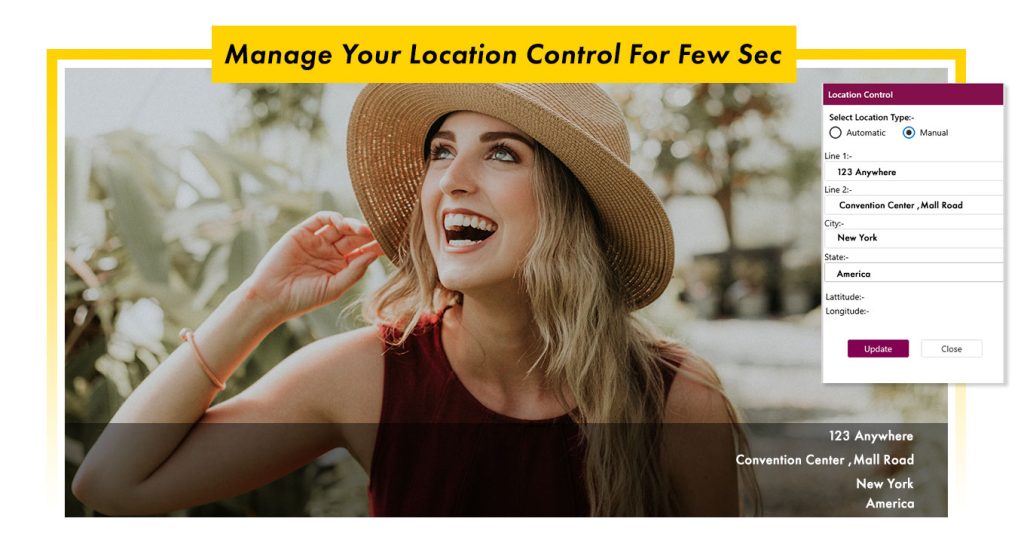
Step 5:-
- Now, click on the ‘Add Location‘ button and choose your location either automatically or manually.
- The ‘Automatic‘ option allows you to apply a live location to your image, while the ‘Manual‘ option lets you manually input your location. After adding the location, click on ‘Update‘ and Your Location’.
Step 6 :- Now, click on the ‘Save‘ button to save your GPS map camera image creation and start sharing it with family and friends.